…and Re-holster
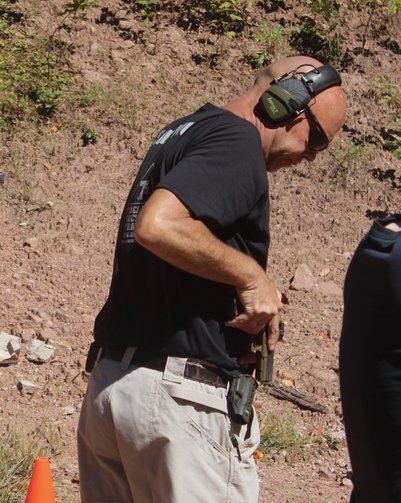
Jim Benoit, Cajun Arms re-holster
Why the safest move you make might be the one at the end
In the world of firearms training, most of the attention goes to the draw, the first shot, and the mechanics of engaging a threat. That makes sense—those are the moments that decide outcomes. But there’s a critical piece of the puzzle that often gets rushed, overlooked, or misunderstood:
The re-holster.
I recently came across an article in a trade journal discussing what they called the “draw in reverse.” It immediately resonated. For those of you who have trained with us at Cajun Arms, you’ve already heard this concept—even if it wasn’t labeled that way. The idea is simple, but powerful:
Every time you re-holster, you are practicing your draw—backwards.
And if you treat it that way, your skill, safety, and confidence all improve.
The Draw… in Reverse
Repetition is the foundation of any defensive skill. Smooth, efficient movement doesn’t happen by accident—it’s built through consistent, correct practice.
When you’re doing dry fire, working with a laser training system, or even running live drills, the re-holster is not downtime—it’s training time. It’s your opportunity to reinforce:
- Proper grip acquisition
- Trigger finger discipline
- Muzzle awareness
- Economy of motion
If your draw is a four-part process, then your re-holster is those same four parts—executed in reverse, deliberately and safely.
Done correctly, it becomes one of the most valuable repetitions you’ll perform.
A Reality Check Most People Don’t Talk About
Here’s something that may surprise newer shooters:
Re-holstering is not a “fight-winning” skill.
There is no prize for getting your gun back into the holster quickly. In fact, quite the opposite is true.
Many negligent discharges happen during re-holstering, not during the draw or firing sequence. Why?
Because people rush.
Because they get complacent.
Because they treat it as an afterthought.
Some instructors will tell you never to look at your holster when re-holstering. We take a different approach—one grounded in reality and safety:
If you take holstering lightly, you’re increasing your risk of injury.
During a single training day, a student might re-holster 100+ times. Statistically, that makes it one of the most dangerous moments in training if handled carelessly.
Our goal is simple:
Everyone goes home the same way they showed up—no extra holes.
The Four-Part Draw (And What Comes After)
et’s quickly revisit the draw—because understanding it is key to understanding the re-holster.
1. Establish the Grip
Your draw starts with a full, consistent firing grip on the pistol while it’s still in the holster. This grip should not change throughout the process.
2. Draw and Index
As the pistol clears the holster, your trigger finger is indexed—straight along the frame. It does not enter the trigger guard.
3. Presentation / Position Three
Before full extension, we emphasize control and retention. Position three allows you to maintain close control of the firearm if needed.
4. Decision to Fire
Only after you’ve made the conscious decision to shoot does your finger move to the trigger.
After the Engagement
Let’s assume you had to engage a threat.
Once that threat is no longer a threat:
- Your finger comes off the trigger immediately
- You return to a controlled position (position three)
- You scan your surroundings
This scan serves two purposes:
- Threat assessment – Criminals rarely operate alone
- Breaking tunnel vision – A very real physiological response under stress
Only after this process is complete do you even begin to think about re-holstering.
There Is No Rush to Re-Holster
This is where discipline matters most.
Whether in training or in a real-world encounter:
There is absolutely no reason to hurry your gun back into the holster.
In a defensive situation, your priorities are:
- Ensure there are no additional threats
- Maintain control of your environment
- Call 911 when appropriate
In training, you’re simply resetting for the next repetition.
Either way—the gun isn’t going anywhere. There’s no timer. No prize for speed.
How to Re-Holster Safely (Every Time)
When it’s time to re-holster, slow everything down and follow a deliberate process:
- Look the gun into the holster
- Visually confirm the holster is clear of obstructions (clothing, cords, debris)
- Maintain your firing grip
- Do not adjust or weaken your grip to make holstering easier
- Trigger finger stays indexed
- Straight along the frame—non-negotiable
- Control the muzzle
- Be especially mindful with appendix carry—slight lean back to avoid covering your body
- Watch for holster issues
- If using a soft or collapsed holster, remove it and re-holster off-body
- Move slowly and deliberately
- Think: reluctant to re-holster, not eager
The Mindset: “Reluctant to Re-Holster”
We say this often in class:
“Reluctantly re-holster.”
That phrase carries weight.
It reminds you that:
- The situation may not be fully resolved
- Your awareness should remain high
- Your safety depends on discipline—not speed
Every safe, deliberate re-holster reinforces good habits. Every rushed one opens the door to mistakes.
Final Thoughts
The draw might win the fight—but the re-holster ensures you walk away from training (and life) uninjured.
Treat it with the respect it deserves.
Slow down. Stay deliberate. Stay aware.
And remember—every time you re-holster,
you’re building your draw.
Stay safe, and we’ll see you on the range.
- How to Build a Personal Defensive Training Plan
- Why Qualification Scores Don't Measure Defensive Readiness
- The Hidden Costs of Cheap Firearms Training
- What Experienced Concealed Carriers Wish They Knew Earlier
- What Skills Matter Most in a Defensive Encounter?
- How Often Should You Train With Your Carry Gun?
- Why Most Gun Owners Plateau After Their First Training Class
- Why Serious Shooters Across Pennsylvania Train With Cajun Arms
- Why Training Matters More Than Gear
- Mistakes Intermediate Shooters Still Make